12 ways to boost fps and optimize your PC for gaming
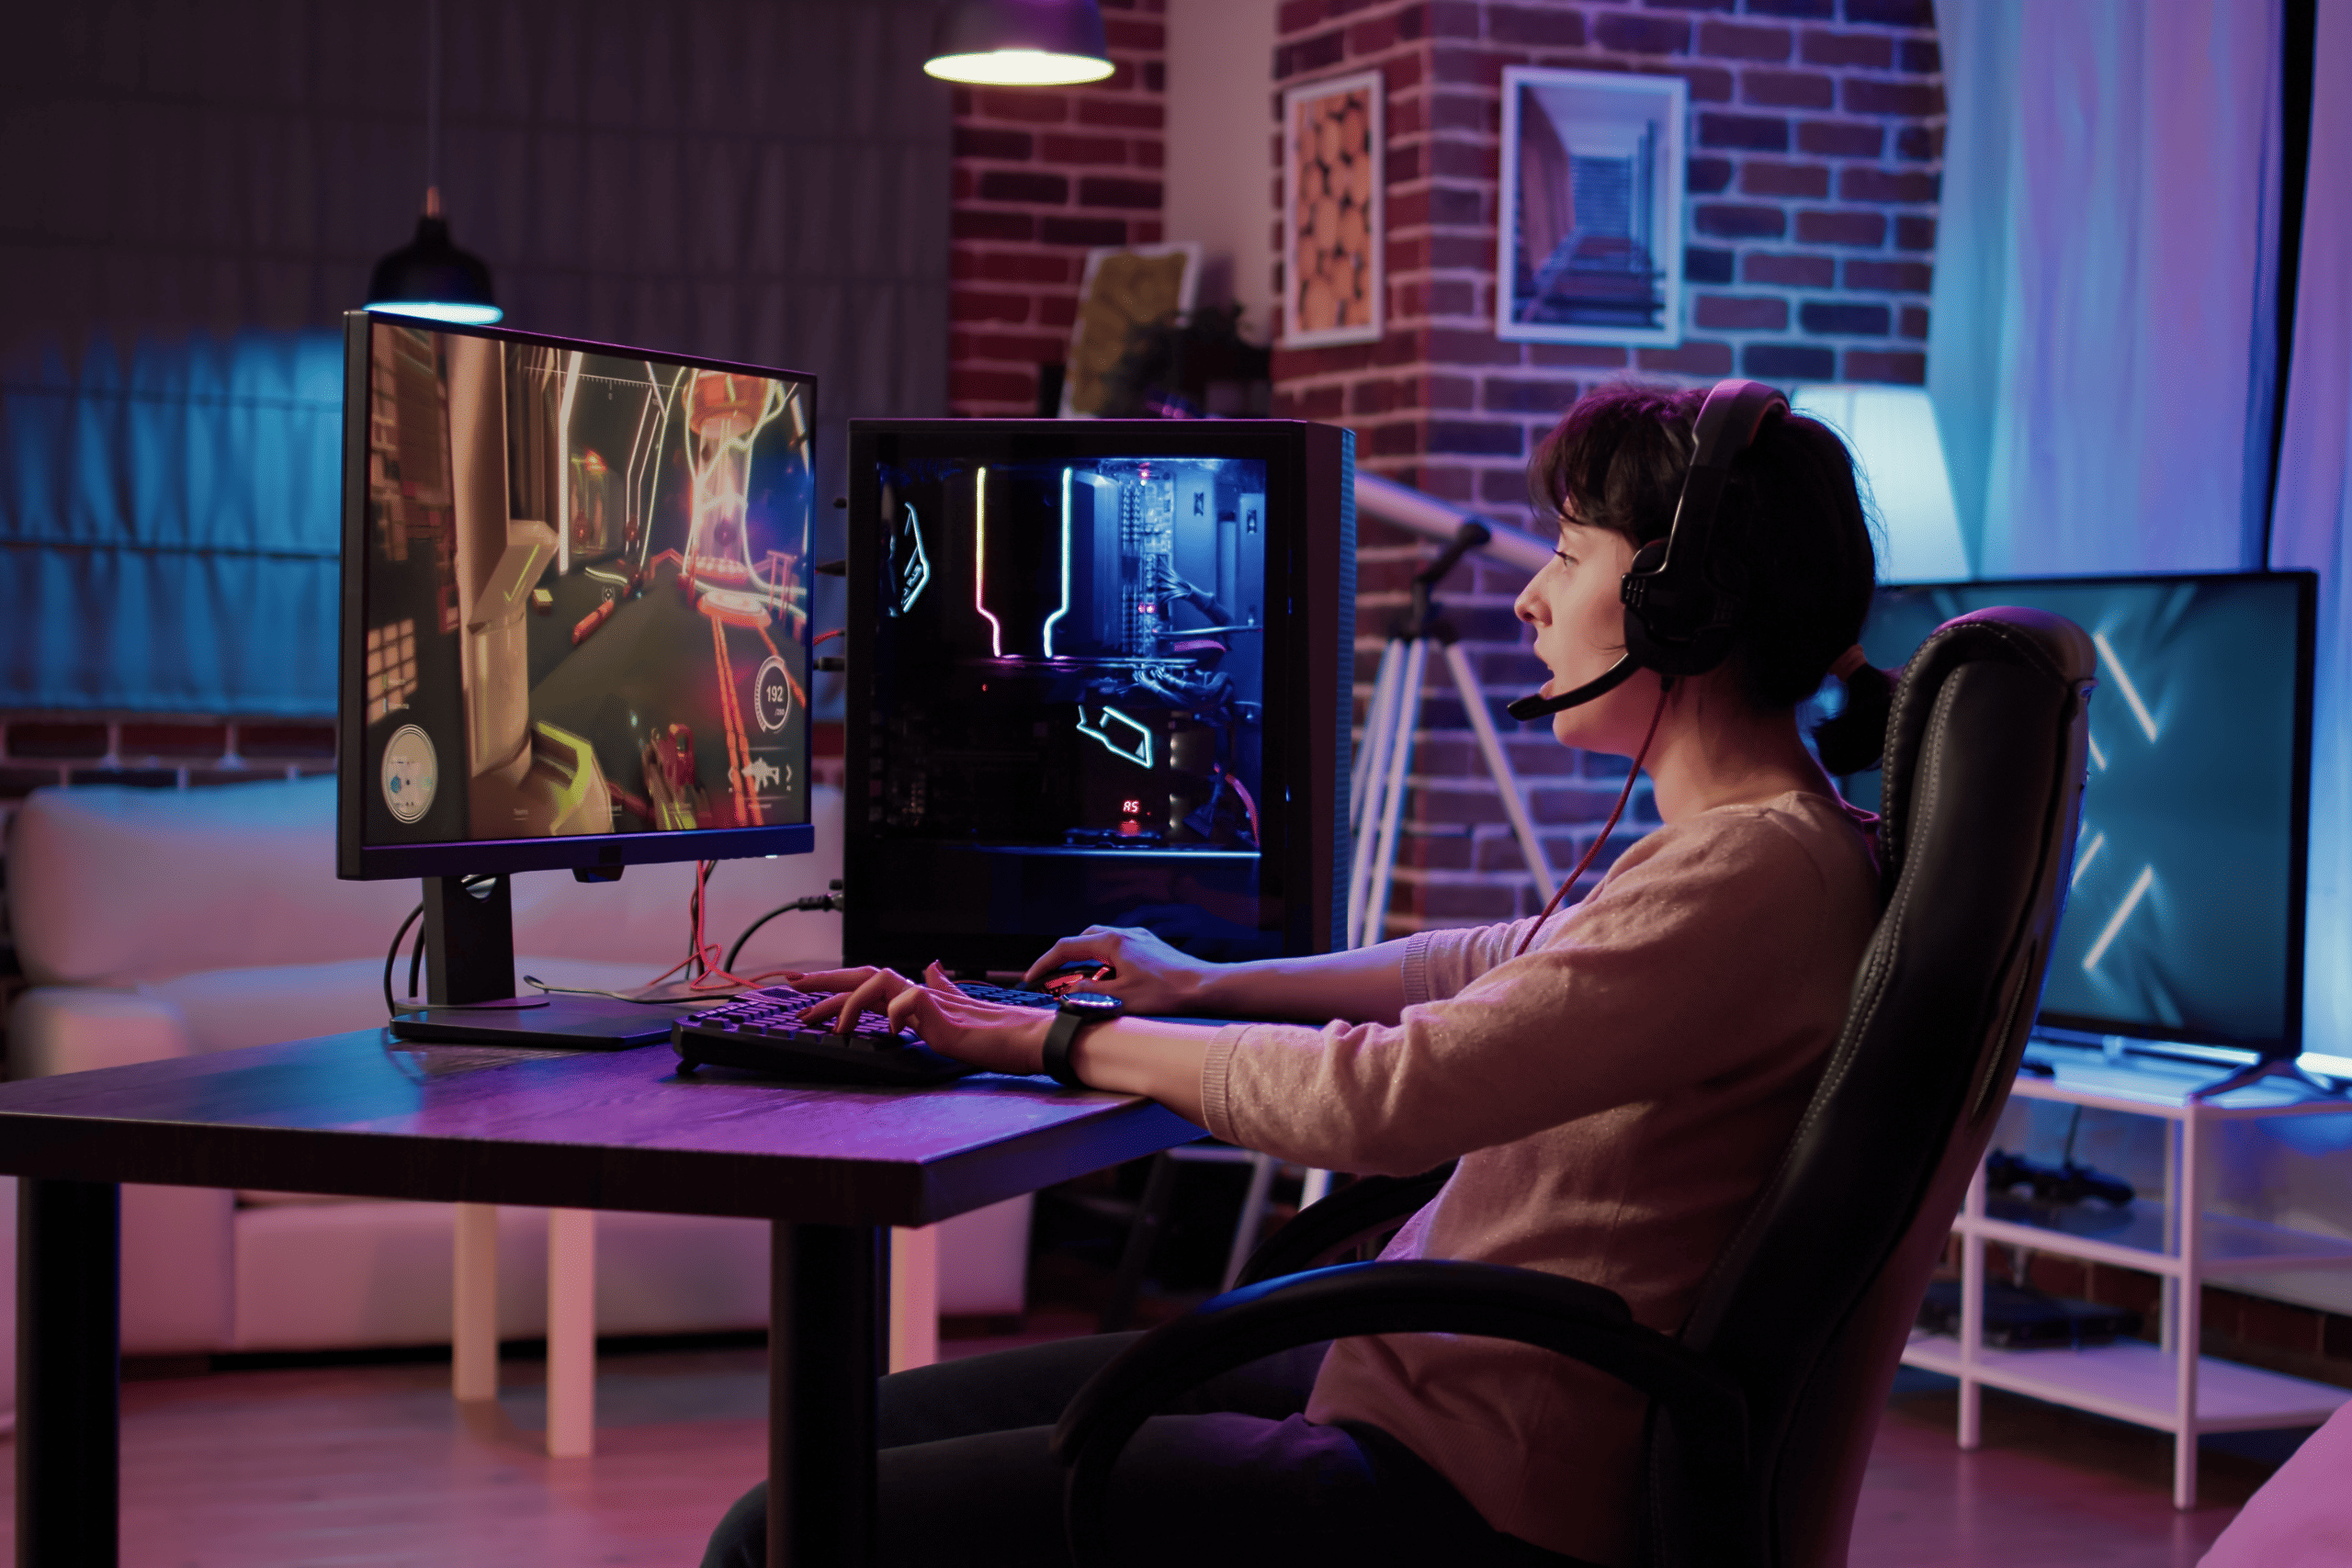
Your gaming experience can be greatly influenced by your computer’s performance. With simple yet effective strategies, you can unlock your computer’s full potential and turn your gaming sessions into mind-blowing adventures.
In this guide, we will look at 12 basic yet incredibly efficient ways to optimize your PC for gaming. From upgrading drivers to installing SSDs, these approaches can help you get the most out of your system.
Why is my PC experiencing a low FPS rate and affecting my gaming performance?
Frame rate (expressed in frames per second or FPS) refers to the number of frames that the graphics card can render and the display can show within a second.
Low fps can result in a less smooth and responsive gaming experience which manifests as choppy, laggy, or stuttering visuals. Your gaming PC will experience a low fps rate due to several factors. These include:
1. Insufficient system resources
PCs not meeting the system requirements for the game being played is one of the key reasons they perform slowly or do not respond at all. Likewise, insufficient RAM, an outdated graphics card, or a slow processor can hinder gaming performance.
Insufficient RAM limits the ability of your PC to handle the data and assets of the game efficiently, resulting in longer loading times and overall slower performance.
If you have an outdated graphics card that does not support the latest graphics technologies, you may experience poor image quality and even compatibility issues with certain games.
2. Overheating
Gaming can put a significant strain on the PC’s hardware, causing it to generate heat. As temperatures rise, the components of the PC become thermally stressed, causing them to throttle or reduce their performance to prevent damage. This, when not taken care of, can potentially damage the hardware and lead to system instability or even permanent failure.
Likewise, if your PC’s cooling system is not properly maintained or is clogged with dust and debris, it can lead to overheating, consequently impacting gaming performance negatively. Excessive heat can degrade the performance and lifespan of the CPU, graphics card, and other sensitive parts, reducing their overall effectiveness over time.
3. Fragmented hard drive
Fragmentation occurs when files on the hard drive are scattered into fragments rather than being stored sequentially, affecting the PC’s ability to read and access data efficiently.
Anytime you launch a game, the PC retrieves the necessary game files, including models and sound files. If these files are fragmented across the hard drive, it makes it harder for the PC to retrieve all the necessary data in time, causing delays in loading times.
4. Internet connection issues
For online gaming, a stable and fast internet connection is crucial for smooth gaming and interactions with other players. When you have an internet connection issue, it has several negative impacts on gaming, which include delays in data transmission between the gaming server and your PC and frequent disconnections or packet loss.
How do I boost FPS and optimize my PC for gaming?
To increase your fps and optimize your PC for gaming, follow these steps:
1. Update your GPU and audio drivers
Most computers do not update drivers automatically. Hence, some manufacturers design software specific to their GPU brand that checks for updates on a regular basis and tells you if you need to update your drivers.
These programs include Radeon Software Adrenaline for AMD GPUs and GeForce Experience for NVIDIA GPUs. These software packages make it easier to keep your GPU drivers up to date, which can be time-consuming; you must visit the manufacturer’s website to install an update based on your GPU model.
Note:
In addition to driver updates and optimizations, software like GeForce Experience adds game capture and streaming tools that allow you to record and share your gaming experiences.
To update your audio and graphics drivers, follow these step-by-step instructions (I’ll be using Windows 11 in the demonstrations):
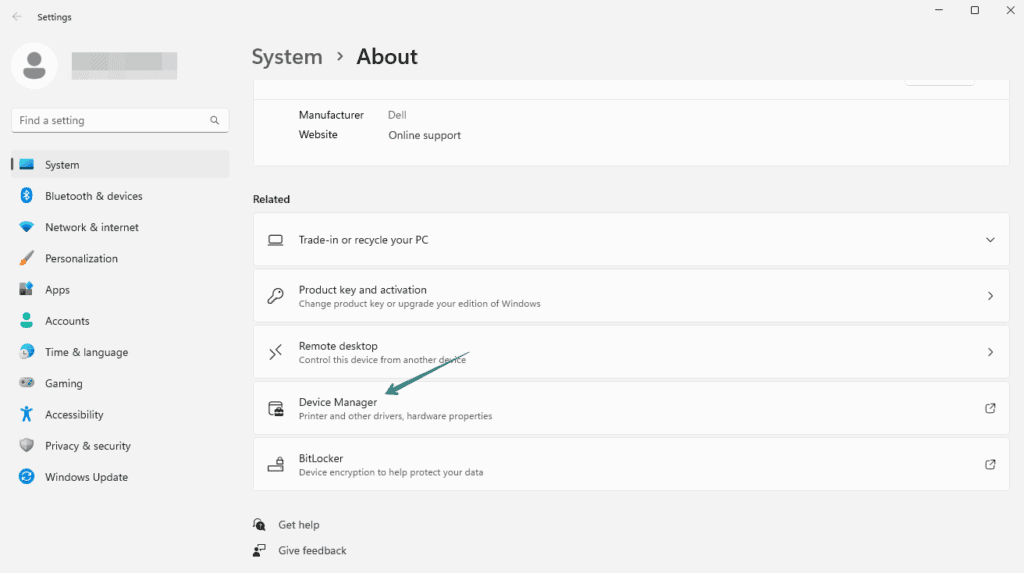
- First, identify the precise graphics card and audio device installed on your PC; simply right-click on the Windows Start menu and choose “System.”

- Scroll down and choose “Device Manager” to open the Device Manager window.
- For graphics cards:
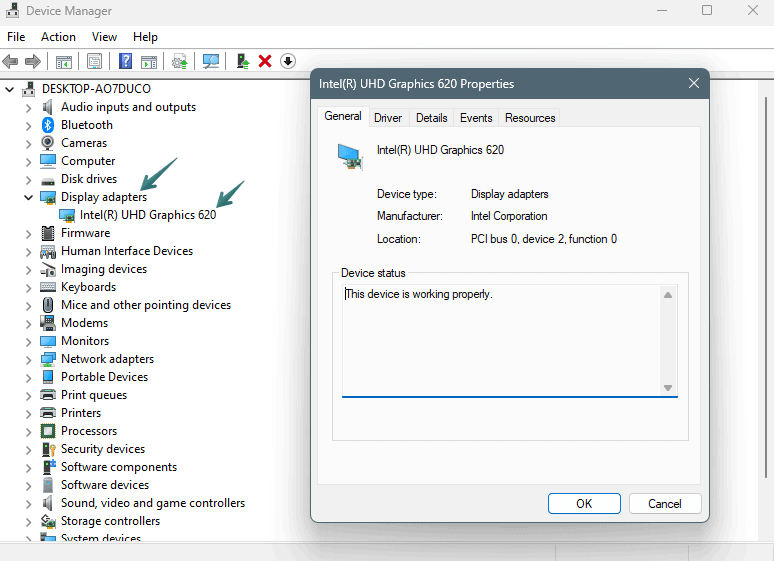
- In the window, expand the “Display adapters” category to view your graphics card.
- Double-click the graphics card to display its properties.
- For audio devices:
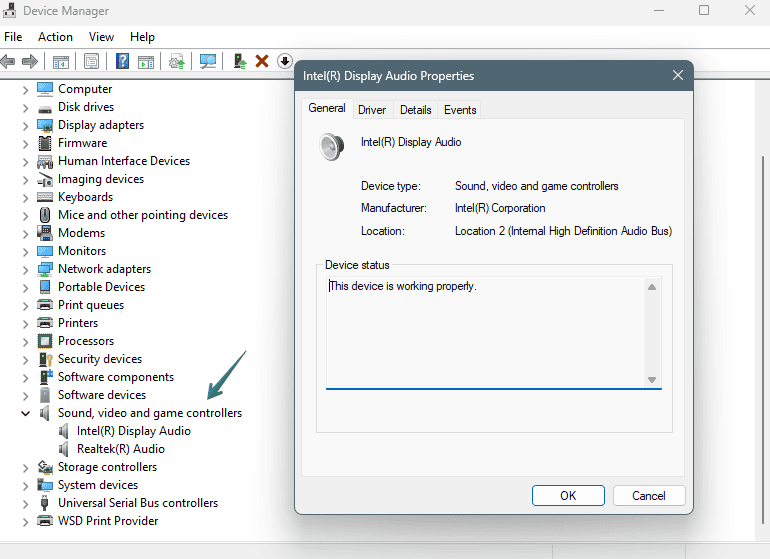
- Expand the “Sound, video, and game controllers” category to view your audio device.
- Double-click the audio device to display its properties.
Quick tip:
For users of other Windows versions and operating systems, here are alternative methods:
1. On macOS: Click on the Apple menu, select “About This Mac,” and then click on “System Report” to access detailed hardware information, including your graphics card.
2. Third-Party Tools: Utilize third-party system information tools such as CPU-Z, GPU-Z, or Speccy. These tools can provide comprehensive hardware information, including details about your graphics card and audio device.
- Visit the manufacturer’s website.
- For graphics cards: Intel Graphics, Nvidia, and AMD drivers.
- For audio drivers: Realtek Audio, Creative Audio, and ASUS.
- Select your GPU or audio device model and check for an update.
2. Enable Game mode
If your PC uses Windows as its operating system, then you’re in luck here. The game mode is a special feature on new versions of Windows, such as Windows 10 and 11 and their subsequent versions.
Activating Game Mode on your PC optimizes system resources and minimizes interruptions from background processes when gaming. It achieves this by reducing background processes, limiting notifications, and fine-tuning system settings for best performance.
Game Mode is by default turned on, but to do a quick check:
- Open the Windows Settings. To do this, you can open the Start menu and click on the gear-shaped Settings icon, or alternatively, you can press the Windows key + I.
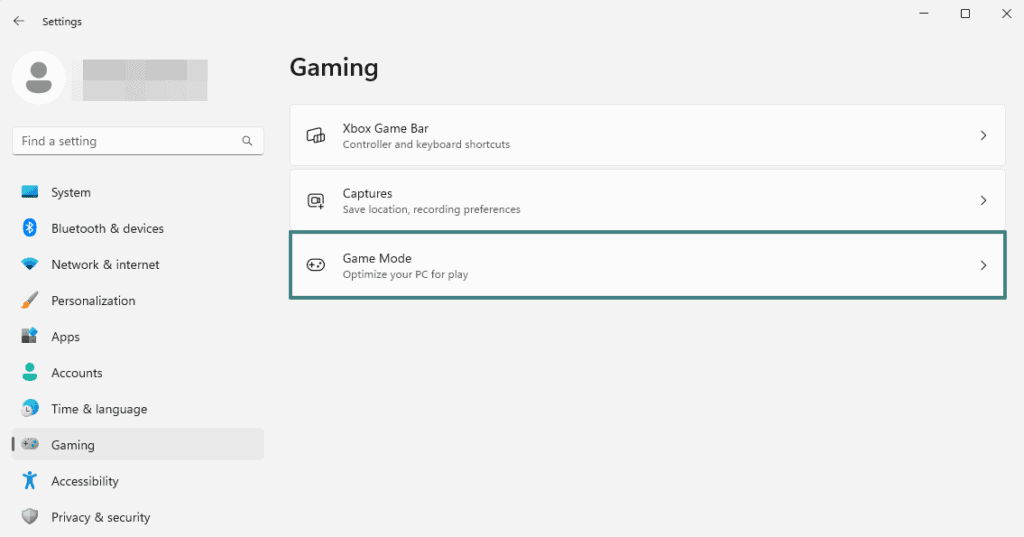
- Click on Gaming in the Settings menu. This opens the gaming settings page.

- Click on the Game Mode tab, which is located on the left-hand side of the Gaming Settings page.
- Toggle the Game Mode switch to the ON position if it’s turned off.
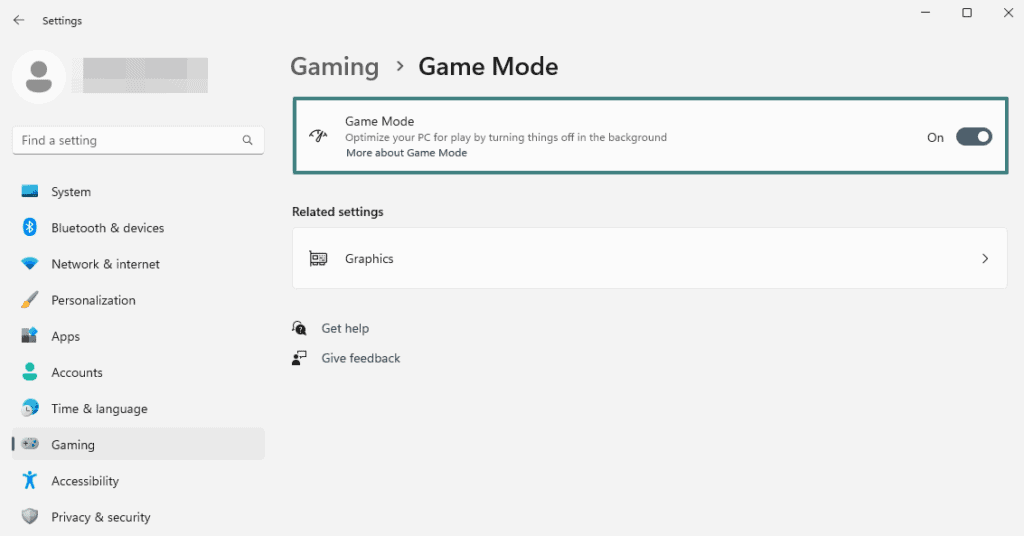
Alternatively, you can search for “Game Mode” in the search box in the Settings menu to enable Game Mode. You may optionally customize additional settings by clicking on the “Xbox Game Bar” on the Gaming Settings page to tweak gaming settings and change the volume.
3. Disable notifications
Notification pop-ups reduce gaming performance by causing distractions and possibly utilizing system resources. They can also temporarily divert your attention and break your focus while gaming, which can be especially annoying during intensive or competitive gaming sessions.
To disable notifications:
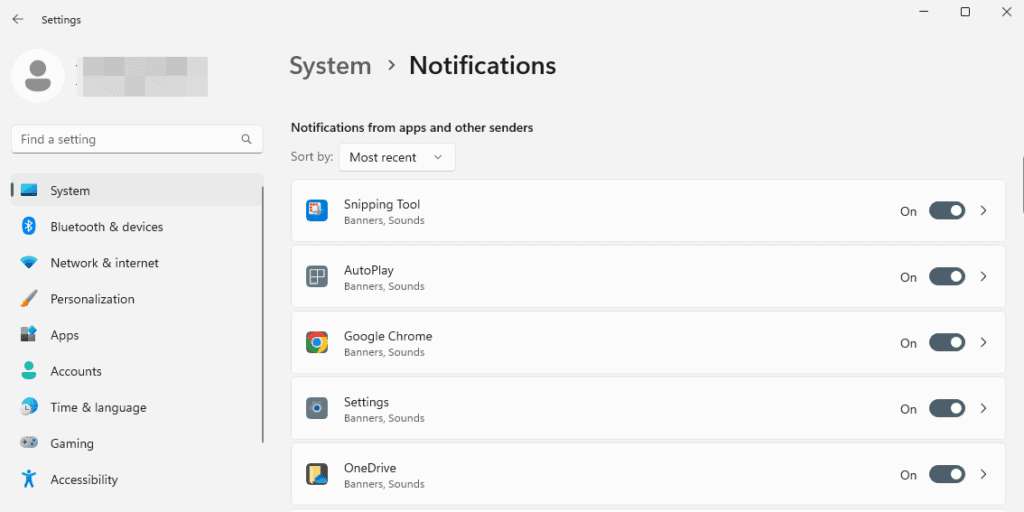
- Go to “Settings” > “System” > “Notifications.”
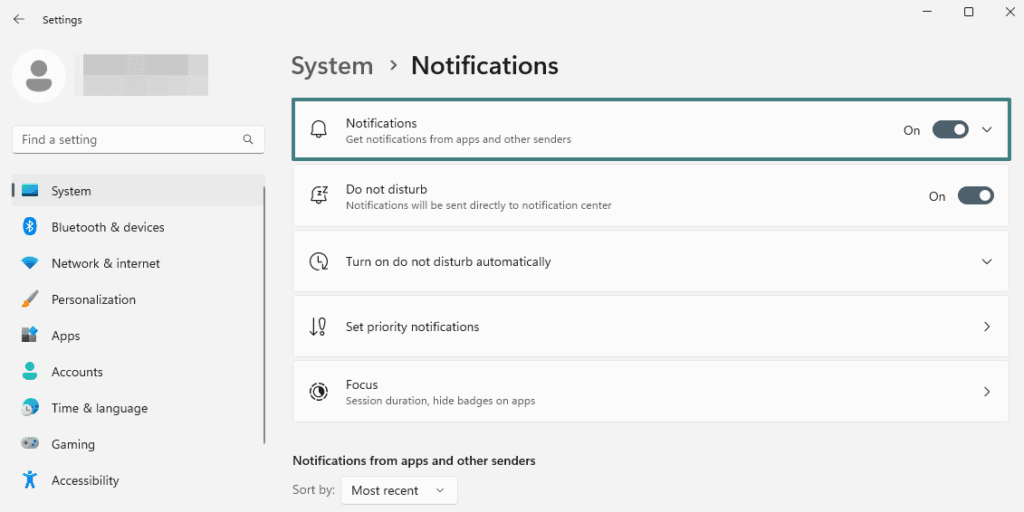
- To disable all notifications, toggle the “Get notifications from apps and other senders” switch to the OFF position.
- To stop notifications for certain applications only, scroll down to the “Notifications from other apps and senders” section and turn off the switch for each app separately.
Optionally, you can also configure additional settings, such as the notification display duration and whether notifications can override Focus Assist.
To optimize gaming using Focus Assist:
- Go to “Settings” > “System” > “Focus Assist.”
- Choose an amount of time for your focus (or gaming) session.
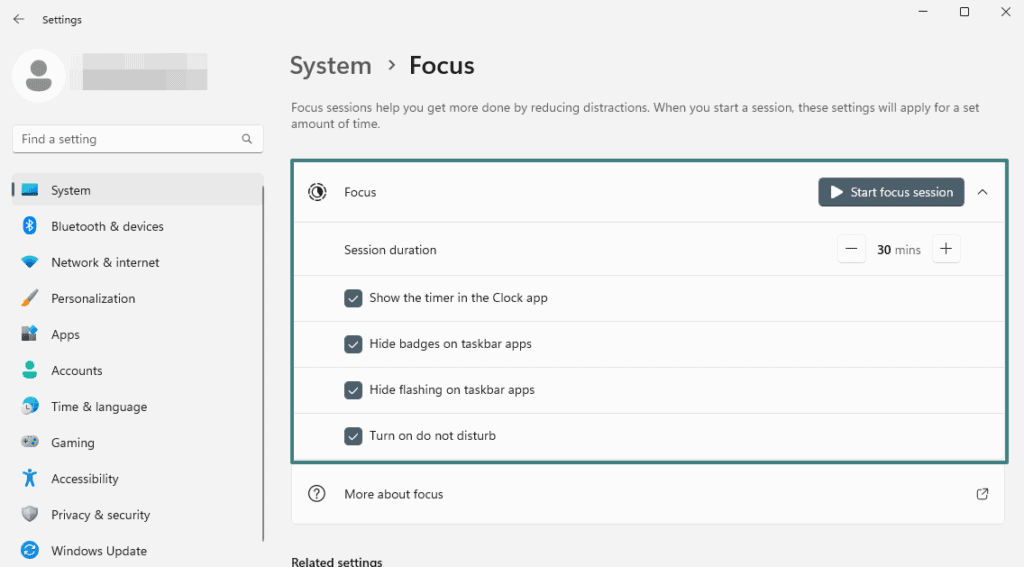
Windows 11 Focus Assist
For Windows 11 users, the “Focus” feature helps you maintain concentration and reduce distractions. Note that “Do Not Disturb” has replaced the “Focus Assist” feature from Windows 10.
During a focus session, a focus timer will be displayed on your screen; “Do Not Disturb” mode will activate; apps in the taskbar won’t flash to alert you, and badge notifications on apps in the taskbar will be turned off.
4. Close background applications
Background activities like Windows updates and apps on your PC can use up system resources such as CPU, memory, and disk space, resulting in reduced frame rates, higher input latency, and overall decreased responsiveness.
Here’s how to identify and close unnecessary applications and processes.
- Open the Task Manager by pressing “Ctrl + Shift + Esc” or “Ctrl + Alt + Delete” and selecting “Task Manager.”
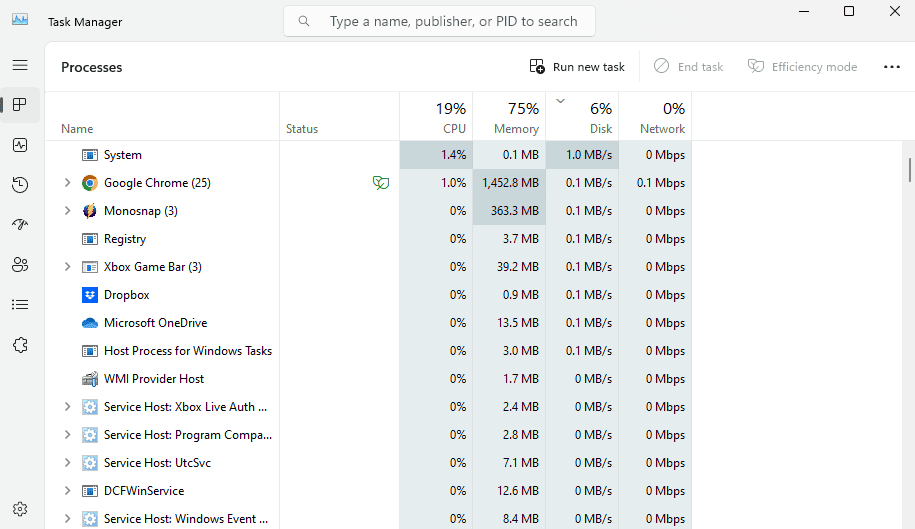
- You can see a list of running processes and their resource usage. Sort the list by CPU, memory, or disk usage to identify applications or processes consuming significant resources.
- Look for unnecessary programs running in the background that you don’t need while gaming and exit them.
Some apps run automatically when your computer boots, eating system resources in the background. To make them inoperable,
- Navigate to the “Startup apps” tab and uncheck any unwanted programs from starting up with your PC.
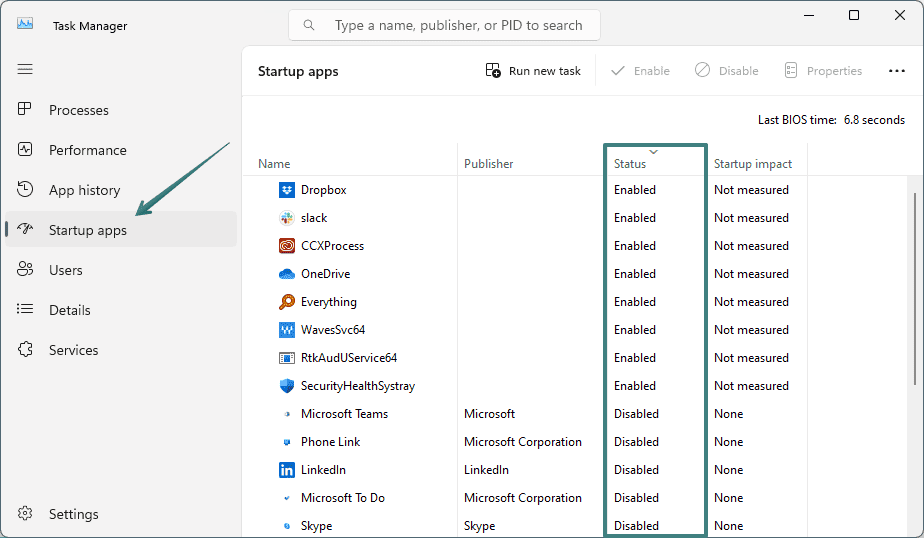
- Right-click the application and choose “Disable” or “Enable” to change its launch behavior.
Steam and Epic Games Launcher, for example, can run in the background and eat resources. Examine their settings to turn off any unneeded background processes or auto-updates
5. Use a wired connection
Wireless connections, such as Wi-Fi, can introduce latency and instability, which can affect gaming performance. Higher latency can cause significant lag, making your inputs seem delayed and impairing your game’s real-time responsiveness.
They are also liable to interference from other electrical devices, physical obstructions, or nearby Wi-Fi networks, resulting in packet loss, signal drops, general instability, and interruptions during gaming sessions.
You can fix this issue by connecting your PC directly to the router using an Ethernet cable.
6. Adjust your graphics settings
Fine-tuning graphics settings on a PC game has a considerable influence on gaming performance in the sense that it optimizes the balance between visual quality and fps rate. By adjusting your graphics settings, you can modify the level of detail, resolution, and other visual effects in games which can, in effect, increase the fps rate.
There are several ways adjusting your graphics settings can impact your gaming performance positively. This includes:
- Texture quality: Textures in games alter the visual details of objects and surfaces. Lowering texture quality can help save VRAM and increase performance, but it may result in less detailed textures.
- Shadows: Shadows provide depth and realism to the gaming environment, but they can consume a lot of resources. Lowering the quality of shadows or turning off dynamic shadows can improve performance.
- Anti-aliasing: This technique smoothens jagged edges and enhances image quality. It can, however, be burdening the GPU. Choosing a lower anti-aliasing setting or turning it off can improve performance.
- Effects and post-processing: In as much as visual effects such as motion blur, depth of field, ambient occlusion, and other post-processing can improve the visuals, they must be lowered or turned off since they impact gaming performance negatively.
- Vertical synchronization (V-Sync) and refresh rate: V-Sync syncs the fps of the game with the refresh rate of your monitor. Disabling V-Sync can result in increased FPS, but it may also cause screen tearing. Consider modifying V-Sync settings based on your preferences and your monitor’s capabilities.
Quick tip:
When it comes to optimizing graphics settings, remember to make adjustments within the specific game you want to enhance. Typically, you’ll find these settings conveniently located in the game’s settings or options menu.
7. Defrag your hard drive
As mentioned earlier, fragmentation makes retrieval of files very difficult and time-consuming. Defragmentation reorganizes the fragmented files on your hard disk, bringing the file sections closer together and improving data retrieval. Defragmenting also results in faster system performance, including gaming performance.
Here’s how to go about it:
- Press the Windows key + E on your keyboard to open the File Explorer.
- Right-click on the hard drive you want to defrag. Typically, this is the C: drive, where your operating system is installed.
- From the menu, select “Properties.”
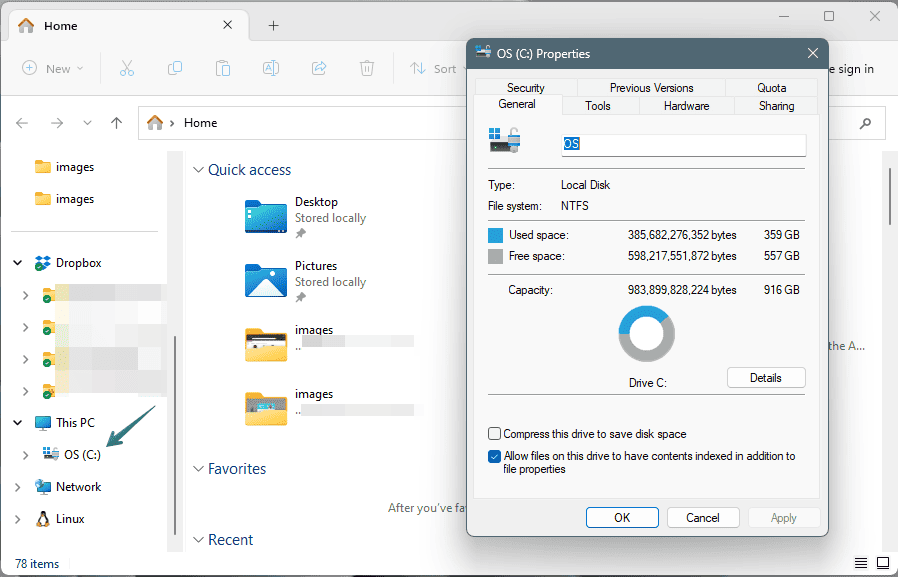
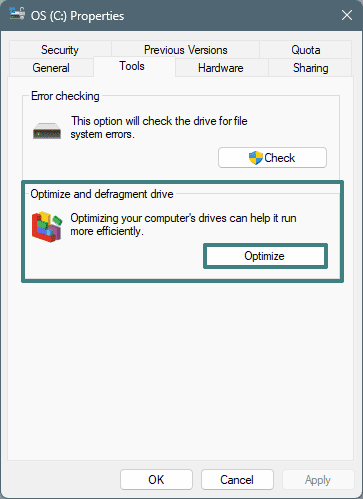
- Navigate to the “Tools” tab, and under the “Optimize and defragment drive” section, click on the “Optimize” button.
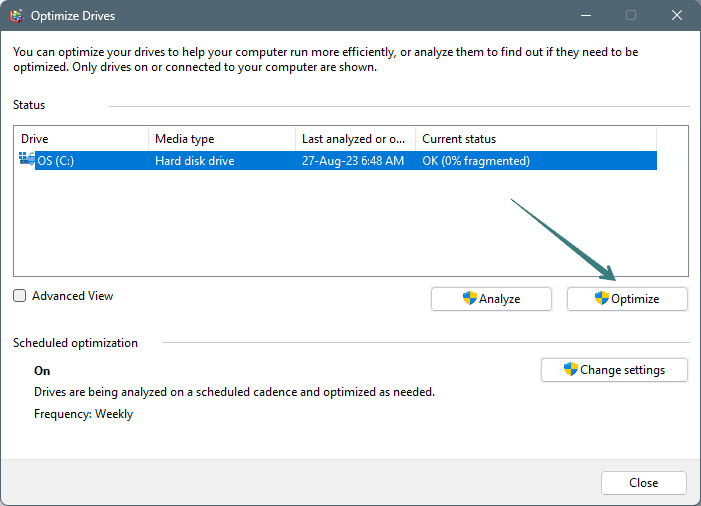
- Select the drive you want to defrag and click on the “Optimize” button.
De-fragmentation is only appropriate for mechanical HDDs. SSDs should never be defragmented since it shortens their lifespan.
Note:
Windows shows the level of fragmentation of each drive (as shown in the screenshot above). If your hard drive, like ours, has 0% fragmentation, you obviously do not need to optimize it.
As a general guideline, it’s advisable to defragment your disk when it becomes more than 10 percent fragmented. For Windows 11, 10, 8, and 7, you have the option to schedule defragmentation as frequently as needed (see “Schedule optimization” in screenshot above).
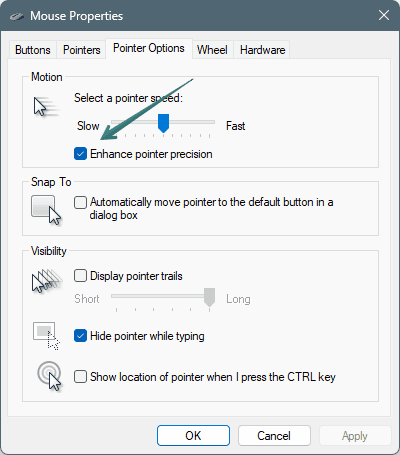
8. Disable ‘Enhance Pointer Precision’
Enhanced Pointer Precision is a Windows PC feature that modifies mouse sensitivity based on movement speed. It is intended to make the mouse pointer travel quicker when the mouse is moved swiftly and slower when the mouse is moved slowly.
This acceleration, however, can generate inconsistencies, making it more difficult to aim at objects and maintain constant tracking motions correctly. Thus, resulting in targets being overshot or undershot, affecting overall gaming performance.
To disable Enhanced Pointer Precision:
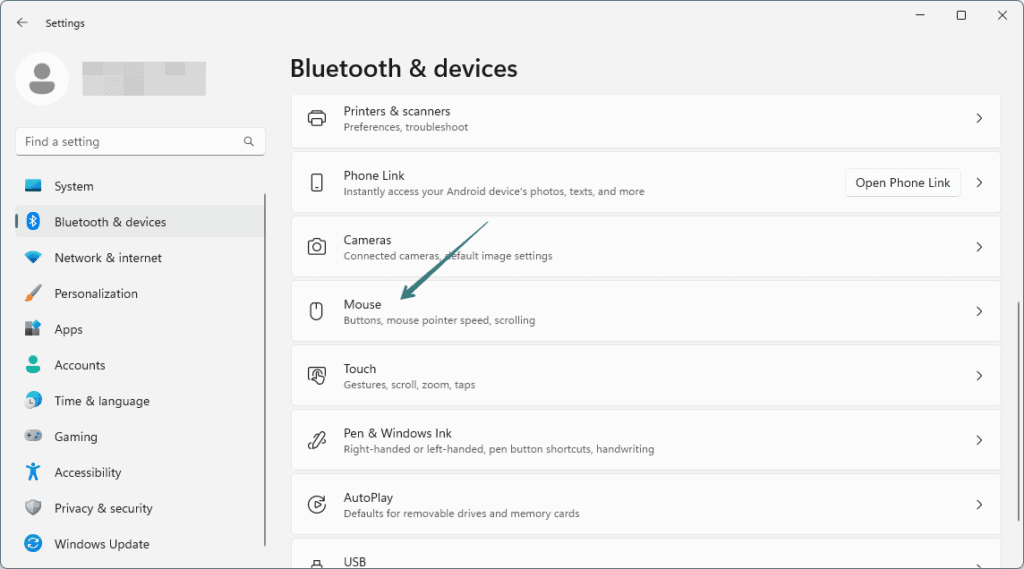
- Go to “Settings” > “Bluetooth & devices” and click on the ‘Mouse’ tab.
- Click on “Additional mouse options” to open the Mouse Properties dialog box.
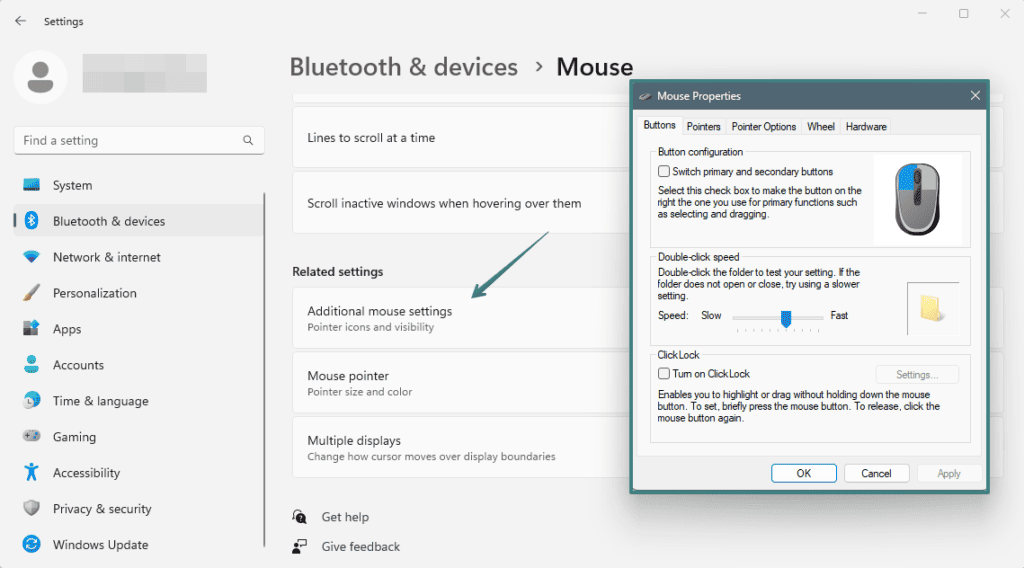
- Go to the ‘Pointer Options’ tab and uncheck “Enhance pointer precision.”
- Click on “Apply.”
9. Monitor your PC’s temperature
When your PC’s CPU or GPU reaches high temperatures, their clock speeds reduce automatically to prevent harm. This results in system crashes, freezes, or abrupt shutdowns, which can disrupt your gaming experiences and even cause data loss or hardware damage.
To optimize cooling to prevent overheating,
- Keep your PC clean: Dust accumulation can obstruct airflow and cause components to overheat. To eliminate dust, clean your PC’s internal components, fans, and vents on a regular basis.
- Proper ventilation: Ensure proper airflow in your PC by arranging wires and preventing obstacles near the vent. If required, consider installing case fans.
- Upgrade CPU and GPU cooling: If you are consistently experiencing excessive temperatures, try upgrading your CPU cooler or GPU cooler. Heat dissipation can be improved using aftermarket coolers or liquid cooling methods.
- Applying the thermal paste: Thermal paste is used to ensure proper heat transmission between the CPU/GPU and their respective coolers. Applying a new thermal paste might assist in enhancing cooling performance if you experience excessive temperatures.
- Avoid overclocking: Overclocking increases heat generation and stresses components. If your hardware is already overheating, consider operating it at stock frequencies or at lower overclocks.
- Use fan control software: Many motherboards have fan control settings in the BIOS or via dedicated software. Changing fan speeds based on temperature can assist in maintaining adequate cooling.
Alternatively, you can monitor your PC’s temperature by using various software utilities. Some popular temperature monitoring programs include:
- Core Temp: Displays real-time temperature readings of your CPU cores.
- MSI Afterburner: In addition to GPU overclocking, this tool also monitors the temperature of your graphics card.
- HWMonitor: Shows temperature readings for various components such as CPU, GPU, and hard drives.
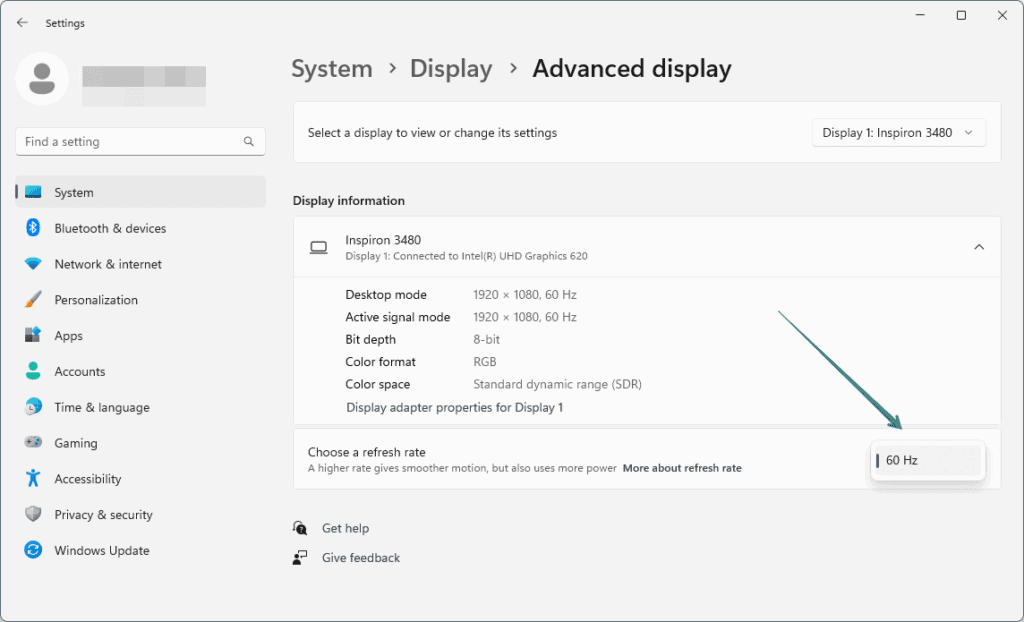
10. Adjust your monitor refresh rate
Higher refresh rates provide more frequent updates to the screen, resulting in smoother and more responsive visuals. This means fast-paced movements in your games appear clearer and more precise, reducing motion artifacts and improving your ability to track objects or aim accurately.
To adjust the monitor refresh rate,
- Right-click on your desktop and select “Display settings.”
- Scroll down to “Advanced display.”
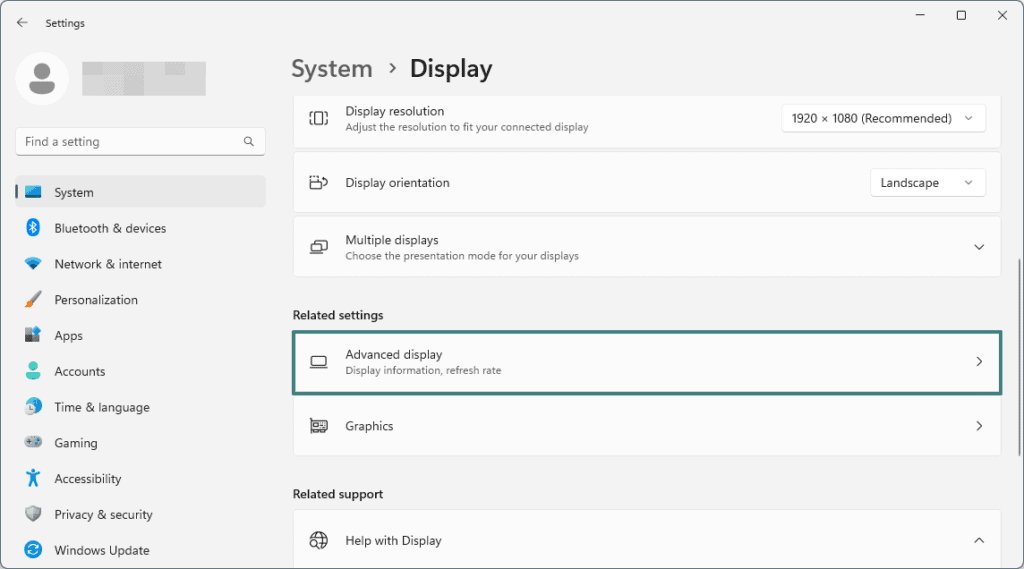
- Click on the dropdown menu and select the highest refresh rate from the available options. Common refresh rates include 60Hz, 75Hz, 120Hz, or 144Hz, depending on your monitor’s capabilities.
11. Lower your game resolution
Game resolution is the number of pixels displayed on the screen per frame. Lowering the game resolution reduces the number of pixels rendered, which decreases the workload on your graphics card and CPU. To do this,
- Launch the game and access the in-game settings menu.
- Look for the “Graphics” or “Display” settings section and locate the option related to the resolution. It is usually presented as a dropdown menu or a slider.
- Select a lower resolution from the available options. The options may include standard resolutions such as 1920×1080 (Full HD), 1280×720 (HD), or even lower resolutions.
- Apply the changes and exit the settings menu.
Note:
This process may vary depending on the game you’re playing.
12. Install an SSD
Compared to traditional hard drives, SSDs employ flash memory for quicker data access, enhanced performance, and shorter loading times. Their faster data access helps reduce lag and stuttering in games, resulting in smoother gaming and improved responsiveness.
Before migrating your Operating System and games to an SSD, ensure you have a backup of important files and data. You can do this in two ways:
- Disk Cloning: To clone your existing system drive to the SSD, use disk cloning software (e.g., Clonezilla, Macrium Reflect). This duplicates your present setups on the new drive exactly.
- Fresh Installation: Install a fresh copy of the operating system on the SSD and reinstall your games and applications. This method allows for a clean installation and optimal performance.
FAQs
Final notes
You should be able to optimize your PC for gaming without breaking the bank.
Whether it’s updating drivers, disabling Enhanced Pointer Precision, or performing regular maintenance, these optimizations can help you achieve better gameplay, decreased lag, and an overall improved gaming experience.
Experiment with these tips and find the optimal settings that suit your PC’s capabilities and your gaming interests.

Leave a Comment